Time for another visit to Audley's Workshop! Back on the subject of
the Halo sandbox this time rather than maps. And this time, I'm
going to be talking about something very near and dear to my and the
majority of Halo players' everywhere's hearts. A piece of the Halo
sandbox that was welcomed with open arms and loved by everyone who
ever used it.
And in case you haven't caught onto the sarcasm just yet...
I'm talking about Armor Abilities (and some Halo 3 equipment).
Now, you probably already want to stop reading because I mentioned
those two awful words that made many a Halo player stop playing. But
I encourage you to stay, even after I make this shocking next
statement: I liked the idea of armor abilities. I just
despised the implementation, both from the perspective of a player
and from the perspective of a designer.
Today, I'm specifically going to be speaking about the abilities that
were designed to increase your survivability. And although I stress
mobility is survivability, I'm not going to be speaking on
mobility today – we'll save that for another time. For this
subject, we're talking:
- Reach Armor Lock
- H4 Hardlight Shield
- H3 Bubble Shield
- H3 Regenerator
- Reach Drop Shield
Before I delve into any individual bit, I want to point out why these
are generally all bad for Halo's gameplay. The general consensus
among players that complained about them revolved around two
arguments. The first, “It lets an idiot get away with making dumb
plays and survive.” The second, “It slows down gameplay.”
To anyone arguing the former: No, shut up, you're wrong. It
increases the amount of play options available to a player by giving
them more opportunities to survive an encounter or wait for help.
Them taking a survivability ability alone does not guarantee the
“dumb play” will work. It enables them to make larger perceived
risks with the knowledge they have more safety than is immediately
apparent. This is actually a positive in my eyes.
But then you take the latter. Slowing down gameplay. Making it more
time consuming to punish players for overextension is frustrating in
the best case scenario. In the worst case, it gives the aggressive
idiot time to be saved by his teammate. (Audley, weren't you just
saying they can take more perceived risks? Wouldn't this be one of
those?)
Let's talk Armor Lock.

Armor Lock was by far my favorite (and probably my most used) Armor
Ability in Halo Reach. I adored its two primary functions: Parrying
explosives and EMPing vehicles.
Unfortunately, Armor Lock was overtuned. Although it was meant as a
method to survive fatal damage and to disable vehicles, it ended up
being far stronger. Vehicles had to be terrified of attempting to
splatter players running across an open field, as Armor Lock wouldn't
just EMP their vehicle. It would outright destroy it. The attempted
splatter would deal more damage to the vehicle than running full
speed into a brick wall or colliding with another vehicle.
Rather than being used to survive fatal damage, players would hold
Armor Lock for its insanely long duration and wait for teammates to
come clean up. In some cases, such as Slayer variants on Countdown
in default settings, full teams of Armor Lock played their own
version of leap frog alternating armor locks to take down opponents.
It was a grave oversight that led to extremely poor emergent
gameplay.
The nerfs given to the ability when 343 took over were too
conservative. Armor Lock had two distinct niches in which it could
exist, as outlined above.
Gutting the duration of Armor Lock to only let it last a fraction of
a second (you know, to make it specifically avoid bursts of damage)
would've gone a long way toward making the ability require skill to
use rather than “Let me go make a dumb play and bait people while
I'm invincible.”
Further, removing the self-inflicted vehicular suicide functionality
(and replacing it with further stressing of the Armor Lock's original
intent of EMPing the vehicle) would also have made the ability less
daunting in the context of Big Team Battle or open maps.
Even with these two extreme nerfs (duration and reflected damage),
Armor Lock still is the dominant choice in its niche (surviving fatal
explosions and avoiding being splattered by vehicles) – but “edge
case” (read: THE WAY IT ACTUALLY GOT USED ALL THE FUCKING TIME)
uses of overextending and sitting in your impenetrable glowy fortress
of autofellatio for 5 seconds while praying your teammates saved you
would be completely eradicated.
It also wouldn't effect the little known aspect of the Armor Lock EMP
that I abused – where the shields of a player would be drained when
used at melee range, allowing you to instantly kill a player with a
melee if they stood over your armor locking body. This added a
nuance to CQB encounters, and if the Armor Lock duration were more
along the lines of a quarter of a second rather than several seconds,
it could lead to players attempting to block an enemy melee and
immediately countering with EMP+Melee of their own if CQB devolved
into a fist fight.
Armor Lock is fixed. But let's stay on the same track for our next
subject.

The good ol' Hardlight Shield.
This was another instance of an armor ability that had really cool
moments, but ultimately degraded into a “Oh, fuck, I'm going to die
so let me just hold onto this button as long as I possibly can and
pray for deus ex machina or for them to run out of ammo!” ability.
Hardlight Shield was really cool when you deflected a rocket right
back at the rocketeer and killed him with it. It was a rare
occurrence since the deflection angles were really awkward and hard
to figure out (too much curve to the shield, made it really hard to
actually aim.)
Like Armor Lock, HLS was a really cool parry option introduced to
Halo. And also like Armor Lock, rather than embracing the Parry
identity, it was given a lengthy duration which turned its identity
into a hulking Riot Shield-esque ability which slowed your movements
while blocking any incoming damage from that direction.
343 definitely learned lessons from Armor Lock in Hardlight Shield's
design: shields didn't recharge during use, and the immunity to
damage was only directional. They seem to have also decided Armor
Lock's immunity to being splattered was too strong and allowed HLS
users to become pavement paint.
Hardlight Shield was essentially a nerfed Armor Lock – you are
still exposed to damage from most directions (and even some areas on
the front, like your feet) and still susceptible to grenades, so long
as they're thrown a little extra distance. Because of these
additional vulnerabilities, I managed to convince Gh057Ayame to
include Hardlight Shield for testing as one of the potential Armor
Abilities to call down with Personal Ordnance in Team Throwdown
settings.
However, despite being a “nerfed version of Armor Lock” its
dragging duration allowed players to use it while trying to hobble
back into cover during a losing fight, or to simply wait for a
teammate to be able to help. I recall seeing Pistola use the ability
in one AGL tournament to great effect, as the Wizard of staying alive
would certainly do. He abused its power well and made sure to annoy
enemy players by appearing to be overextended, but knowing he could
get back to cover if he truly wanted to.
I think one of the biggest mistakes in the Hardlight Shield's design
was the continued focus on reduced mobility in exchange for its
damage mitigation. So Audley, what would you have changed about
Hardlight Shield if you had been its designer?
- Reduce the duration. Maybe not a quarter second like Armor Lock (since this is much more vulnerable) – something closer to 1-1.5s. A full 1v1 kill time worth of timing, but no more.
- Leave the player's mobility completely in tact. That's right, even allow them to sprint with the Hardlight Shield up. This encourages a player in a hallway battle to activate their shield and rush at the unsuspecting foe. It encourages making aggressive plays with the ability.
- Normalize the deflection of the shield / Flatten the shield. Make it so things hitting you head on are deflected directly back (in most cases, it seemed things went off to the right.). The ability to deflect rockets back at the rocketeer (or Scorpion tank shells) was one of the most interesting interactions of the ability. HIGHLIGHT THIS INTERACTION.
With these three changes, the Hardlight Shield encourages more
aggressive usage, while also giving it a more highlighted niche as a
strong ability to use in choke points. With the improved deflection
and the maintained mobility, it also increases the potency of selfish
use of the ability, rather than having to rely on teammates to help
you, or encouraging use defensively to stall for time.
Hardlight Shield and Armor Lock are now more fun to play with and
against. Let's move on.
Halo 3 gave us the Bubble Shield and the Regenerator,
and Reach bastardized them with its Drop Shield. All three
were extremely important in the context of BTB, but were absolutely
banned from competitive 4v4 settings. Drop Shield made Oddball games
extremely one-dimensional.

Halo 3's Bubble Shield saw four primary use cases.
- Place on an Armed Bomb to buy time to disarm.
- Place at a doorway in order to give space to escape and/or safety to board a vehicle
- Place in an open area with large space between points of cover to stop and recharge your shields before pushing up further.
- Place to bait players with larger effective range to come fight you inside the bubble (whether this meant you had a shotgun and were trying to get an easy CQB kill, or if you were hiding from a vehicle to try to bait them into splattering you but turning the tides with a Plasma Grenade or highjack.)
In most cases, these were pretty healthy for the game. But on
smaller maps, numbers three and four become problematic. In a long
ranged battle and afraid you'll lose? BUBBLE! Have a Shotgun and
can't get close? BUBBLE! Down a shot? BUBBLE!
Although the Bubble Shield had many avenues for proactive use, it's
also a strong stall tactic, with very limited options for counterplay
unless you were already in close quarters. The Bubble could be
destroyed from the inside (or knocked away with a grav lift or some
of the ball equipment like Power Drains or Radar Jammers).
If you were outside the Bubble, you were shit out of luck. You had
no way to burst the Bubble. No way to damage the Bubble. Nothing to
do but wait. There's nothing fun about that.
If you were inside the Bubble, and no one came in, you were shit out
of luck. You were stared at by watchful eyes. No way to damage them
from inside your zone of safety. Nothing to do but wait for your
eventual demise. There's nothing fun about that either.
Bubble Shields in these cases were the definition of anti-fun.
Neither side gains any fun from using the Bubble Shield in this
manner. For the side whose kill was denied by the cowardly option,
their fun was taken away.
On the other hand, Regenerators in Halo 3 ended up being used quite a
bit differently. The most common use case for a Regenerator was
simply to tank long range shots while you won the gun battle.
Because a Sniper or a grenade+well-timed shot could kill you within
the Regen, the “bait safely with Shotgun” use cases were not
available.

In the case of CQB combat, use of the equipment was not favored
toward “whoever had the better CQB weapon” (as was the case for a
Bubble Shield) but rather, “Who used the Regenerator?” – the
person outside the regenerator continues taking damage until they get
into range of the field (at which point they may also reap its
benefits.) Whereas with the Bubble Shield, neither player may
exchange damage until both are on the same side of the Bubble, much
like dreaded shield doors.
Comparing the two directly,
- The Bubble Shield was stronger at countering power weapons (as it made the person inside immune to external damage.)
- The Bubble Shield had less options for counterplay, limiting such options only to players able to infiltrate the shield. The Regenerator player could be killed through teamwork, power weapons, or very good grenade+weapon usage.
- In the context of impending CQB, the Regenerator gave more power to the player who used it as opposed to the player with a CQB weapon. A rushing player with a BR and a Shotgun was susceptible to a player inside Regenerator with a BR, but would likely win against someone who threw a Bubble Shield.
Overall, however, the two generally fulfill similar niches. I
mentioned in my Rat's Nest post the Regenerator was better for
aggressive plays while the Bubble Shield was better saved for
protecting spawners or disarming a Bomb – this is still true (after
all, can't mass-slay the people disarming the bomb with your rockets
if they throw a Bubble Shield on the Bomb plant.)
Removing the Bubble Shield option all together, however, would be a
superior option, as it prevents the earning of a power weapon from
being countered by a much more commonly spawning piece of equipment,
and increases the amount of effort a defending team must execute to
disarm the bomb.
If the “I want to avoid this one Rocket” function a Bubble Shield
brings is deemed necessary, the Regenerator could deploy an outward
force field when first activated that immediately dissipates. You
know... like a parry. (I seem to like those, yeah?)
For all other intents and purposes, such as temporary cover or time
to regain shields...the Bubble Shield's functionality could've been
covered by a piece of equipment we never saw used on a single Halo 3
map: Deployable Cover. In addition to having the counterplay options
of “just go around it” Deployable Cover's design also caused the
shield to disappear after a certain amount of damage had been taken,
meaning regardless of duration, players wanting the shield to go away
could make it go away.
In short, GET RID OF THE FUCKING BUBBLE SHIELD. (And maybe
slightly nerf the Regen to improve the potential for a player inside
one to lose a ranged 1v1 battle if the enemy fires perfect shots.)
But then we have this fucker...
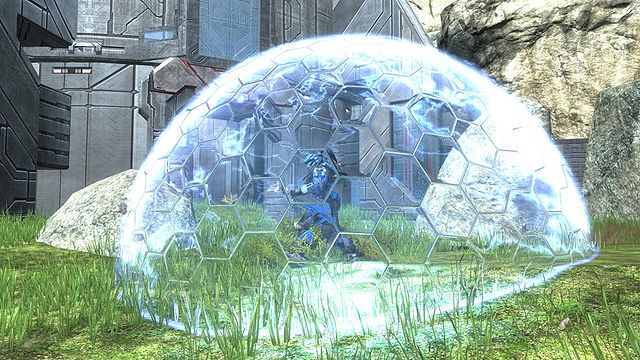
The Halo Reach Drop Shield.
Because someone looked at the Halo 3 Bubble Shield and Halo 3
Regenerator and thought, “Hey, these two kinda overlap in their
intended roles. Why don't we COMBINE them?!”
It didn't take more than a week of post-launch matchmaking to find
instances of players spawning with Bubbles breaking a gametype.
Nothing like trying to play 4v4 Oddball where the entire game is
centered around a nigh-impenetrable dome of safety. Oh, your Drop
Shield expired? I gotchu fam.
I mentioned Bubble Shields could only be destroyed from inside. Drop
Shield at least realized this mistake and allowed it to expire based
off damage (more like the Deployable Cover).
In BTB, we saw Drop Shield used on Boardwalk one-sided objective to
troll chain bubbles of immunity while running a flag home or running
a bomb in.
We rarely saw the Drop Shield used to create a “field of safety”
from vehicles out in the field (partially due to how overpowered
Armor Lock was) – it was occasionally used for attempted flag
steals on Hemorrhage for getting into a vehicle. But even then, it
was too big of a trade off to give up on other armor abilities to
maybe get a flag into a vehicle if you managed to make it to the base
without being destroyed.
Before it was realized Warthogs were essentially useless, it was
common for drivers to take Drop Shield in order to recover safely if
the vehicle flipped. But that didn't last long.
In Drop Shield's case, it exhibited the problem of trying to take an
on-map piece of equipment and translating it into a repeatable use
ability for players, regardless of cooldown. It's also a problem
I'll address in a later Audley's Workshop when I talk about
Empire-Specific Rocket Launchers in PlanetSide 2 (scalability –
balancing a tool available to one person versus the tool being used
by GROUPS of people).
Before Drop Shield was ever given the green light by Halo Reach's
design team, two questions should've been asked:
- For what reason should a player take this ability over the others?
- What will happen if this ability is in the hands of every player?
After both of those were asked, chances are its problems would've
been a bit clearer prior to its release to the general public.
And, as with the case of the Bubble Shield, it probably would've been
realized that the Drop Shield had no true purpose belonging in Big
Team Battle. In cases where the shield is being deployed to survive
in the open field, are players ever actually advancing, or just
delaying? In cases where the shield is being deployed to protect an
objective, is there actual counter-play available with other
abilities or who haven't gone out of their way to pick up a Plasma
Pistol.
But rather than outright remove the Drop Shield... let's make it into
something that can work in Halo.
The main issue, in my eyes, is the area of survivability is limited
to where you cast the ability. So before we move further, let's
change the name. Drop Shield is now Safeguard.
When Safeguard is cast, a somewhat small (half/a third of the size of
normal Drop Shield Bubble) semi-transparent sphere is created around
the player. The player who cast Safeguard may still use their
weapons freely. However, any foreign bullets, projectiles, etc. that
come into contact with the sphere have their damage reduced
substantially (by ~80%) and transferred to the player whose sphere
they have come into contact with. This sphere moves with the player
as the player moves.
The sphere could also be given stages of damage like Reach vehicles,
causing the bubble to shrink in size (with both damage and duration
rapidly causing stage transitions) and decreasing the amount of
damage mitigation from the sphere.
Now you've taken an immobile shield without much purpose outside of
protecting an objective and turned it into a selfish defensive
mechanism for turning a player temporarily into a pseudotank (still
able to be killed), at the expense of being an easier target to hit.
This new form would encourage pushing across open terrain, aggressive
flanks or engagements, and prevent players from stacking their
shields as a sort of Road to Glory for flag or Permanent Thunderdome
for Oddball. Players wishing to use Safeguard to protect teammates
would be forced to actively use their bodies to shield their
teammates.
Suddenly you've turned Drop Shield into a more active ability with
more incentive for aggressive use and less room for abuse cases.
And my work here is done. Until next time, folks!