
Showing posts with label halo reach. Show all posts

Tuesday, September 8, 2015

Audley's Workshop: Another Visit to the Halo Sandbox

Time for another visit to Audley's Workshop! Back on the subject of the Halo sandbox this time rather than maps. And this time, I'm going to be talking about something very near and dear to my and the majority of Halo players' everywhere's hearts. A piece of the Halo sandbox that was welcomed with open arms and loved by everyone who ever used it.

And in case you haven't caught onto the sarcasm just yet...

I'm talking about Armor Abilities (and some Halo 3 equipment).

Now, you probably already want to stop reading because I mentioned those two awful words that made many a Halo player stop playing. But I encourage you to stay, even after I make this shocking next statement: I liked the idea of armor abilities. I just despised the implementation, both from the perspective of a player and from the perspective of a designer.

Today, I'm specifically going to be speaking about the abilities that were designed to increase your survivability. And although I stress mobility is survivability, I'm not going to be speaking on mobility today – we'll save that for another time. For this subject, we're talking:

  • Reach Armor Lock
  • H4 Hardlight Shield
  • H3 Bubble Shield
  • H3 Regenerator
  • Reach Drop Shield

Before I delve into any individual bit, I want to point out why these are generally all bad for Halo's gameplay. The general consensus among players that complained about them revolved around two arguments. The first, “It lets an idiot get away with making dumb plays and survive.” The second, “It slows down gameplay.”

To anyone arguing the former: No, shut up, you're wrong. It increases the amount of play options available to a player by giving them more opportunities to survive an encounter or wait for help. Them taking a survivability ability alone does not guarantee the “dumb play” will work. It enables them to make larger perceived risks with the knowledge they have more safety than is immediately apparent. This is actually a positive in my eyes.

But then you take the latter. Slowing down gameplay. Making it more time consuming to punish players for overextension is frustrating in the best case scenario. In the worst case, it gives the aggressive idiot time to be saved by his teammate. (Audley, weren't you just saying they can take more perceived risks? Wouldn't this be one of those?)

Let's talk Armor Lock.


Armor Lock was by far my favorite (and probably my most used) Armor Ability in Halo Reach. I adored its two primary functions: Parrying explosives and EMPing vehicles.

Unfortunately, Armor Lock was overtuned. Although it was meant as a method to survive fatal damage and to disable vehicles, it ended up being far stronger. Vehicles had to be terrified of attempting to splatter players running across an open field, as Armor Lock wouldn't just EMP their vehicle. It would outright destroy it. The attempted splatter would deal more damage to the vehicle than running full speed into a brick wall or colliding with another vehicle.

Rather than being used to survive fatal damage, players would hold Armor Lock for its insanely long duration and wait for teammates to come clean up. In some cases, such as Slayer variants on Countdown in default settings, full teams of Armor Lock played their own version of leap frog alternating armor locks to take down opponents. It was a grave oversight that led to extremely poor emergent gameplay.

The nerfs given to the ability when 343 took over were too conservative. Armor Lock had two distinct niches in which it could exist, as outlined above.

Gutting the duration of Armor Lock to only let it last a fraction of a second (you know, to make it specifically avoid bursts of damage) would've gone a long way toward making the ability require skill to use rather than “Let me go make a dumb play and bait people while I'm invincible.”

Further, removing the self-inflicted vehicular suicide functionality (and replacing it with further stressing of the Armor Lock's original intent of EMPing the vehicle) would also have made the ability less daunting in the context of Big Team Battle or open maps.

Even with these two extreme nerfs (duration and reflected damage), Armor Lock still is the dominant choice in its niche (surviving fatal explosions and avoiding being splattered by vehicles) – but “edge case” (read: THE WAY IT ACTUALLY GOT USED ALL THE FUCKING TIME) uses of overextending and sitting in your impenetrable glowy fortress of autofellatio for 5 seconds while praying your teammates saved you would be completely eradicated.

It also wouldn't effect the little known aspect of the Armor Lock EMP that I abused – where the shields of a player would be drained when used at melee range, allowing you to instantly kill a player with a melee if they stood over your armor locking body. This added a nuance to CQB encounters, and if the Armor Lock duration were more along the lines of a quarter of a second rather than several seconds, it could lead to players attempting to block an enemy melee and immediately countering with EMP+Melee of their own if CQB devolved into a fist fight.

Armor Lock is fixed. But let's stay on the same track for our next subject.


The good ol' Hardlight Shield.

This was another instance of an armor ability that had really cool moments, but ultimately degraded into a “Oh, fuck, I'm going to die so let me just hold onto this button as long as I possibly can and pray for deus ex machina or for them to run out of ammo!” ability.

Hardlight Shield was really cool when you deflected a rocket right back at the rocketeer and killed him with it. It was a rare occurrence since the deflection angles were really awkward and hard to figure out (too much curve to the shield, made it really hard to actually aim.)

Like Armor Lock, HLS was a really cool parry option introduced to Halo. And also like Armor Lock, rather than embracing the Parry identity, it was given a lengthy duration which turned its identity into a hulking Riot Shield-esque ability which slowed your movements while blocking any incoming damage from that direction.

343 definitely learned lessons from Armor Lock in Hardlight Shield's design: shields didn't recharge during use, and the immunity to damage was only directional. They seem to have also decided Armor Lock's immunity to being splattered was too strong and allowed HLS users to become pavement paint.

Hardlight Shield was essentially a nerfed Armor Lock – you are still exposed to damage from most directions (and even some areas on the front, like your feet) and still susceptible to grenades, so long as they're thrown a little extra distance. Because of these additional vulnerabilities, I managed to convince Gh057Ayame to include Hardlight Shield for testing as one of the potential Armor Abilities to call down with Personal Ordnance in Team Throwdown settings.

However, despite being a “nerfed version of Armor Lock” its dragging duration allowed players to use it while trying to hobble back into cover during a losing fight, or to simply wait for a teammate to be able to help. I recall seeing Pistola use the ability in one AGL tournament to great effect, as the Wizard of staying alive would certainly do. He abused its power well and made sure to annoy enemy players by appearing to be overextended, but knowing he could get back to cover if he truly wanted to.

I think one of the biggest mistakes in the Hardlight Shield's design was the continued focus on reduced mobility in exchange for its damage mitigation. So Audley, what would you have changed about Hardlight Shield if you had been its designer?
  • Reduce the duration. Maybe not a quarter second like Armor Lock (since this is much more vulnerable) – something closer to 1-1.5s. A full 1v1 kill time worth of timing, but no more.
  • Leave the player's mobility completely in tact. That's right, even allow them to sprint with the Hardlight Shield up. This encourages a player in a hallway battle to activate their shield and rush at the unsuspecting foe. It encourages making aggressive plays with the ability.
  • Normalize the deflection of the shield / Flatten the shield. Make it so things hitting you head on are deflected directly back (in most cases, it seemed things went off to the right.). The ability to deflect rockets back at the rocketeer (or Scorpion tank shells) was one of the most interesting interactions of the ability. HIGHLIGHT THIS INTERACTION.

With these three changes, the Hardlight Shield encourages more aggressive usage, while also giving it a more highlighted niche as a strong ability to use in choke points. With the improved deflection and the maintained mobility, it also increases the potency of selfish use of the ability, rather than having to rely on teammates to help you, or encouraging use defensively to stall for time.

Hardlight Shield and Armor Lock are now more fun to play with and against. Let's move on.

Halo 3 gave us the Bubble Shield and the Regenerator, and Reach bastardized them with its Drop Shield. All three were extremely important in the context of BTB, but were absolutely banned from competitive 4v4 settings. Drop Shield made Oddball games extremely one-dimensional.


Halo 3's Bubble Shield saw four primary use cases.
  1. Place on an Armed Bomb to buy time to disarm.
  2. Place at a doorway in order to give space to escape and/or safety to board a vehicle
  3. Place in an open area with large space between points of cover to stop and recharge your shields before pushing up further.
  4. Place to bait players with larger effective range to come fight you inside the bubble (whether this meant you had a shotgun and were trying to get an easy CQB kill, or if you were hiding from a vehicle to try to bait them into splattering you but turning the tides with a Plasma Grenade or highjack.)

In most cases, these were pretty healthy for the game. But on smaller maps, numbers three and four become problematic. In a long ranged battle and afraid you'll lose? BUBBLE! Have a Shotgun and can't get close? BUBBLE! Down a shot? BUBBLE!

Although the Bubble Shield had many avenues for proactive use, it's also a strong stall tactic, with very limited options for counterplay unless you were already in close quarters. The Bubble could be destroyed from the inside (or knocked away with a grav lift or some of the ball equipment like Power Drains or Radar Jammers).

If you were outside the Bubble, you were shit out of luck. You had no way to burst the Bubble. No way to damage the Bubble. Nothing to do but wait. There's nothing fun about that.

If you were inside the Bubble, and no one came in, you were shit out of luck. You were stared at by watchful eyes. No way to damage them from inside your zone of safety. Nothing to do but wait for your eventual demise. There's nothing fun about that either.

Bubble Shields in these cases were the definition of anti-fun. Neither side gains any fun from using the Bubble Shield in this manner. For the side whose kill was denied by the cowardly option, their fun was taken away.

On the other hand, Regenerators in Halo 3 ended up being used quite a bit differently. The most common use case for a Regenerator was simply to tank long range shots while you won the gun battle. Because a Sniper or a grenade+well-timed shot could kill you within the Regen, the “bait safely with Shotgun” use cases were not available.


In the case of CQB combat, use of the equipment was not favored toward “whoever had the better CQB weapon” (as was the case for a Bubble Shield) but rather, “Who used the Regenerator?” – the person outside the regenerator continues taking damage until they get into range of the field (at which point they may also reap its benefits.) Whereas with the Bubble Shield, neither player may exchange damage until both are on the same side of the Bubble, much like dreaded shield doors.

Comparing the two directly,
  • The Bubble Shield was stronger at countering power weapons (as it made the person inside immune to external damage.)
  • The Bubble Shield had less options for counterplay, limiting such options only to players able to infiltrate the shield. The Regenerator player could be killed through teamwork, power weapons, or very good grenade+weapon usage.
  • In the context of impending CQB, the Regenerator gave more power to the player who used it as opposed to the player with a CQB weapon. A rushing player with a BR and a Shotgun was susceptible to a player inside Regenerator with a BR, but would likely win against someone who threw a Bubble Shield.

Overall, however, the two generally fulfill similar niches. I mentioned in my Rat's Nest post the Regenerator was better for aggressive plays while the Bubble Shield was better saved for protecting spawners or disarming a Bomb – this is still true (after all, can't mass-slay the people disarming the bomb with your rockets if they throw a Bubble Shield on the Bomb plant.)

Removing the Bubble Shield option all together, however, would be a superior option, as it prevents the earning of a power weapon from being countered by a much more commonly spawning piece of equipment, and increases the amount of effort a defending team must execute to disarm the bomb.

If the “I want to avoid this one Rocket” function a Bubble Shield brings is deemed necessary, the Regenerator could deploy an outward force field when first activated that immediately dissipates. You know... like a parry. (I seem to like those, yeah?)

For all other intents and purposes, such as temporary cover or time to regain shields...the Bubble Shield's functionality could've been covered by a piece of equipment we never saw used on a single Halo 3 map: Deployable Cover. In addition to having the counterplay options of “just go around it” Deployable Cover's design also caused the shield to disappear after a certain amount of damage had been taken, meaning regardless of duration, players wanting the shield to go away could make it go away.

In short, GET RID OF THE FUCKING BUBBLE SHIELD. (And maybe slightly nerf the Regen to improve the potential for a player inside one to lose a ranged 1v1 battle if the enemy fires perfect shots.)

But then we have this fucker...
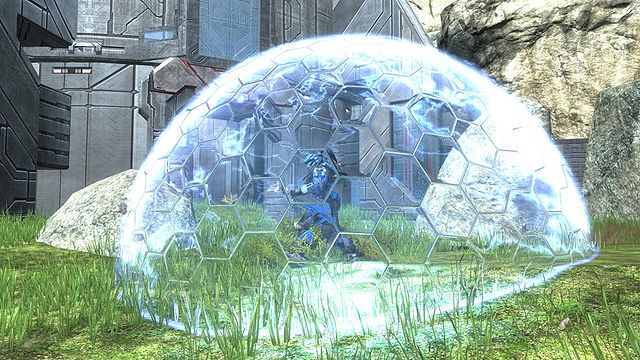


The Halo Reach Drop Shield.

Because someone looked at the Halo 3 Bubble Shield and Halo 3 Regenerator and thought, “Hey, these two kinda overlap in their intended roles. Why don't we COMBINE them?!”

It didn't take more than a week of post-launch matchmaking to find instances of players spawning with Bubbles breaking a gametype. Nothing like trying to play 4v4 Oddball where the entire game is centered around a nigh-impenetrable dome of safety. Oh, your Drop Shield expired? I gotchu fam.

I mentioned Bubble Shields could only be destroyed from inside. Drop Shield at least realized this mistake and allowed it to expire based off damage (more like the Deployable Cover).

In BTB, we saw Drop Shield used on Boardwalk one-sided objective to troll chain bubbles of immunity while running a flag home or running a bomb in.

We rarely saw the Drop Shield used to create a “field of safety” from vehicles out in the field (partially due to how overpowered Armor Lock was) – it was occasionally used for attempted flag steals on Hemorrhage for getting into a vehicle. But even then, it was too big of a trade off to give up on other armor abilities to maybe get a flag into a vehicle if you managed to make it to the base without being destroyed.

Before it was realized Warthogs were essentially useless, it was common for drivers to take Drop Shield in order to recover safely if the vehicle flipped. But that didn't last long.

In Drop Shield's case, it exhibited the problem of trying to take an on-map piece of equipment and translating it into a repeatable use ability for players, regardless of cooldown. It's also a problem I'll address in a later Audley's Workshop when I talk about Empire-Specific Rocket Launchers in PlanetSide 2 (scalability – balancing a tool available to one person versus the tool being used by GROUPS of people).

Before Drop Shield was ever given the green light by Halo Reach's design team, two questions should've been asked:
  • For what reason should a player take this ability over the others?
  • What will happen if this ability is in the hands of every player?

After both of those were asked, chances are its problems would've been a bit clearer prior to its release to the general public.

And, as with the case of the Bubble Shield, it probably would've been realized that the Drop Shield had no true purpose belonging in Big Team Battle. In cases where the shield is being deployed to survive in the open field, are players ever actually advancing, or just delaying? In cases where the shield is being deployed to protect an objective, is there actual counter-play available with other abilities or who haven't gone out of their way to pick up a Plasma Pistol.

But rather than outright remove the Drop Shield... let's make it into something that can work in Halo.

The main issue, in my eyes, is the area of survivability is limited to where you cast the ability. So before we move further, let's change the name. Drop Shield is now Safeguard.

When Safeguard is cast, a somewhat small (half/a third of the size of normal Drop Shield Bubble) semi-transparent sphere is created around the player. The player who cast Safeguard may still use their weapons freely. However, any foreign bullets, projectiles, etc. that come into contact with the sphere have their damage reduced substantially (by ~80%) and transferred to the player whose sphere they have come into contact with. This sphere moves with the player as the player moves.

The sphere could also be given stages of damage like Reach vehicles, causing the bubble to shrink in size (with both damage and duration rapidly causing stage transitions) and decreasing the amount of damage mitigation from the sphere.

Now you've taken an immobile shield without much purpose outside of protecting an objective and turned it into a selfish defensive mechanism for turning a player temporarily into a pseudotank (still able to be killed), at the expense of being an easier target to hit.

This new form would encourage pushing across open terrain, aggressive flanks or engagements, and prevent players from stacking their shields as a sort of Road to Glory for flag or Permanent Thunderdome for Oddball. Players wishing to use Safeguard to protect teammates would be forced to actively use their bodies to shield their teammates.

Suddenly you've turned Drop Shield into a more active ability with more incentive for aggressive use and less room for abuse cases.


And my work here is done. Until next time, folks!

Saturday, June 18, 2011

Practice: What I Preach

So, it may come as a shock to my readers (and anyone who knows me online) that I used to play baseball. That's right, this Lilliputian blogger and habitual nerd used to actually play a physical sport. And despite my stature, I was pretty good at it.

You may offer any explanation you want as to what led to my ability in the game, but I will always respond to one thing that heavily influenced my skill: Practice.

Practice is one of the most important aspects of improving your skill level at anything. Whether it be playing sports, playing an instrument, doing math, cooking, or any other activity where one can be "good" or "bad," practicing the activity will display improvements in one's ability.

My dad hammered one phrase into my brain, and the brains of any of my teammates whenever I played (he was usually one of the assistant coaches) -- you've probably heard this before, but: "You play like you practice."

When it comes to the competitive side of things, the attitude you exhibit in your practices carries over to the attitude you'll likely exhibit during games. Players who go through practice with a haughty attitude tend to leave themselves open to overlooking their opponents, or sometimes their own mistakes. Those who show no will to practice tend to likewise fail to show up (at least mentally) when it comes game time. Those who tend to goof off during practices tend to goof up in games. You see my picture.

Since this blog is most related to Halo, I'll use a recent example from MLG to demonstrate my point -- MLG Columbus. The winners of MLG Dallas, Status Quo, seemed a bit complacent between events. Despite two multiple team LANs being held at the LAN Network famed "Basement," Status Quo attended neither. Prior to Dallas, they LAN'd hard and prepared for the event they were fan favorites to come in and finish Top 3. Prior to Columbus, however, some of their players focused a bit more on other activities and the team did not LAN (although they did set up a LAN with their new sponsor, Red Bull, to take place prior to the third event of the season).

Status Quo finished a disappointing SEVENTH place in Columbus.

Now, I'll admit there are external factors (such as the formation of the fan-acclaimed "Godsquad"), but the fact remains that Status Quo went into Columbus with less quality of practice than they had for Dallas.

Skills need to be used in order to remain sharp. A skill that goes long periods of time without proper use is much like a car that sits in a driveway without being turned on. Eventually, when it comes time to use it, it simply won't work like it used to. (Trust me, I've had a car sit for months and then when it came time to drive it, the battery was dead.)

Keep your skills sharp by maintaining their use. Practice whatever it is you do.

Now, I mentioned "quality" of practice up there. Did you see it? I'm sure you saw it. I'll say it again just to be sure. You need to make sure the quality of your practice is rather high as well.

So what is quality practice? You're probably (I hope not) thinking "Audley, if I want to be a competitive Halo player, I should just search MLG with my team all day and expect to be the best, right?!"

No, shut up, you're wrong. In fact, I'm of the opinion that by just playing the game over and over, your improvements will be miniscule at best. I mean, how many Reclaimers and Inheritors do you see in Halo Reach that just outright suck?

I'll reference physical sports again, to demonstrate my point: in the off-season, how often do teams just play each other over and over as their method of practice? Compared to the other activities they do, it's a very small amount, right?

Baseball, most teams take batting and fielding practice in very stripped down circumstances.
Basketball, players will run up and down the court stopping at a farther line each time. Prior to a game, they take practice shots.
Football, the quarterbacks practice throws. Wide receivers practice routes. Linesmen push dummies around.

Everything gets dumbed down into what we call "drills." Elements of practice designed to improve a player's abilities.

I'll admit this next part comes slightly from something I picked up from Wikipedia (their source: Roberto Moretti) while researching for this Audley Enough article, but it is also something I've stressed to my own teammates when designing practice gametypes throughout Halo 3 and Halo Reach.

There are five processes in ensuring you are practicing quality...well...practice.

First, Identification. Learn what it is you are practicing, to make sure you know how to do it. You have to know what you are looking for in order to find it.

Next, Isolation. Isolation is identifying a single piece of the whole act. Then you move into stage 3, Repetition. You repeat this one process over and over until it becomes second nature. As an example, these two stages could be demonstrated by a beginning piano player playing scales. Once these scales become mindless dances of the fingers, the learner is ready to move on to more complex stages.

Step four, you Integrate your different individual actions together until you they work seamlessly together. This leads to the ability to perform more difficult tasks within your actions.

Finally, you find more tasks that further your abilities as you work toward mastering your craft, Escalating your abilities..

So for the Halo players out there... the Identification stage: Halo Reach as a whole.

But what do you isolate? Most players will immediately focus on their DMR or Sniper accuracy. This is the most basic skill in the game, and it's something that will constantly be in question. It's also one of the skills that will deteriorate the quickest from being out of practice.

The dexterity that is required to aim in first person shooters is all related to muscle memory and hand-eye coordination. These will simply be learned from maintaining a fairly consistent practice schedule. Players who play a lot will typically have a more steady aim than players who take long breaks, then game hard for a few days, rinse, and repeat.

However, there are several other skills that need to be isolated in order to improve as a whole.

I'd like to hail MLG pro player Naded here for something I saw him doing at Columbus as a warm-up, that I thought to be very clever. While most players play a free for all to warm-up, Naded was in a game alone, on Zealot, running around with Sprint and/or Evade practicing different jumps and escape routes around the map. He displayed a very deep knowledge of the map (despite rarely getting to use any of these in a game). He made sure all of those routes were fresh on his mind prior to beginning a series against an enemy team, while also remembering to look at important sight lines (such as top landing to holograms) and ensure he knew where he could see from where he was.

So, Audley, can you name some of these skills that need to be isolated?

All right, for the MLG fans that may be reading this, here's a brief list of INDIVIDUAL skills: Routes, More Routes, Routes Still, Sight Line Studies, Flag Routes, Slayer Routes, Bomb Routes, Escape Routes, Grenade Angles, Grenade Bounces, A Few More Routes, Strafing, Juking, DMR/Sniper Accuracy, Routes Again But With Evade Instead of Sprint, Now Routes with Jetpacks, One More Routes for Good Measure. If you're wondering why I used that one word (If you missed it, I mean ROUTES) so much, I suggest you go back and read the last few Audley Enoughs from before my hiatus.

Now, for your TEAM skills: Sight Line Studies, Routes That Allow Similar Sight Lines from Different Positions, Communication (again, see an older Audley Enough), DMR/Sniper Accuracy, Set-Ups, Routes to Set-Ups, Routes that Counter Set-Ups, Angles that Annoy Set-Ups, Communication, More Sight-Line Studies, and just in case you have a blind person, a final Sight-Line Study.

By Sight-Line studies, I of course mean knowing where EACH AND EVERY POSSIBLE SPOT ON THE MAP can see and be seen from. In MLG, especially in Halo 3 and Halo Reach, team shooting is way more important than your individual ability to win a one on one battle. Additionally, being able not to BE shot is also important, when attempting to flank or run a flag/bomb to their goal.

A team will build chemistry by playing with each other (although some teams have natural degrees of chemistry based on their individual playing styles -- see Dallas '11 Believe the Hype or Anaheim '09 Carbon). However, a team that studies sight lines and routes that can be taken together will use this practice as a catalyst (yes, pun intended) for a quicker chemical reaction.

For those of you that instead play Big Team, and wonder what kind of skills should be practiced... One of the drill maps I had made for Master Theory back in Halo 3 involved a small team attempting to team shoot a Warthog or Banshee (depending on the map/gametype) to death using only BRs or ARs (again, depending on gametype) in order to practice taking down vehicles. The catch was that the Banshee or Warthog users did not have teammates to clean up -- it was a simple drill designed to improve the ability to shoot at vehicles in order to disable them (as well as improve the vehicle pilot's ability to evade heavy focus). To prevent camping and stand-offs, it was a Territories gametype in which territories were placed at each of the standard set-up points, and the round would end if the vehicle allowed the set-up team to capture each territory.

In Reach, back when Countdown was in Big Team, I had made a very plain, nondescript map to go along with a gametype where players spawned with Armor Lock and had the goal of "Out-Armor Locking" each other as their only way of EFFECTIVELY killing one another. I unfortunately never got to test this to see how well it worked, but it was a minor skill that determined a lot of encounters on the early BTB stages of Countdown.

In addition to the skills required for MLG, Big Team players should practice Vehicle routes, angles to teamshoot vehicles, and a shitload of sightline studies if they wish to improve. If you don't understand why this can't be done in normal gameplay, I ask -- is it easier to find out where all you can see in a game where an enemy Sniper is shooting at you, or in a game where you can stop, look in all 360 degrees around you and all angles above/below you? (Easy question. I won't even answer it for you!)

In addition to all of these individual skills, there is also the necessity to practice the most important part of a game -- the opening. I personally find there to be more gain to gotten out of practicing the first four minutes of a game than any of the remainder, regardless of the game type. (The exception to this would of course be for sequenced versions of King of the Hill, where certain hills are not spawned until much later in the game.)

The initial push for power weapons will often determine the pace -- but beyond that, there is also the set-up for the first respawn of power weapons. Even if you are behind after the opening, securing an enemy's Sniper two minutes into a game, or securing the next set of rockets can turn the tide of a game. If you cannot secure the second set, why should the game drag on to give you a chance at the third set? Rinse off the bad game, and repeat it. Try to adjust what you messed up in the opening, and see if the snowball carries you to your second spawn. Keep making minor adjustments on those first few minutes of the game until you can carry momentum throughout.

Of course, Halo is a bit more dynamic than sports like Baseball or Football, since players are temporarily removed from the game for a short duration -- so a lot of these fundamental practices cannot be executed in-game. Beating up on randoms in playlists is a fine way to ensure you all know your roles from the start, but it will rarely reveal chinks in an otherwise fine suit of armor. Scrimmaging other teams -IS- necessary to see how practical what you've practiced can be outside of practice.

Some situations may not ever repeat themselves, some may reveal themselves deep into a game's growth and become commonplace. But the more you expose yourself to the potential of these situations occurring (once your fundamentals are flawless, of course ;) ) the more you can prepare yourself for meeting them a second or third time.

Film review is an important part of practice in competitive gaming as well -- although I'll save that more in-depth subject for a future Audley Enough, I'd like to point out its relevance. Whether you're watching film of opponents or watching film of yourself, you are improving your abilities. I'll even (probably mis)quote Sun Tzu here, "Know your enemy and yourself, find victory in a hundred battles. Know yourself, but not your enemy, find victory and defeat in equal measure. Know neither your enemy or yourself, find defeat in every battle."

It's a lot easier to learn from your mistakes if you are able to see your mistakes played back to you. It's a lot easier to find weaknesses in an opponent's playstyle if you are able to take a break and see your opponent's playstyle up close.

I'll save anything further for a future Audley Enough, going more in-depth on what to look for out of film review, or at least what I personally look for, but I still felt the need to highlight it here.

I've covered so far that practice can improve competency, and it can improve chemistry. However, there is one more C-word that should be the goal of your practices. Confidence.

If your practices aren't building confidence, something needs to be re-done. A practice that destroys confidence is a poor practice. I'll admit I've made mistakes that caused confidence to drop after a practice. The leadership of a practice should be sure participants stay focused on the goals of practice -- even in defeat, positive gains are made. If you're practicing against a tougher opponent, find out what it is the opponents are doing right. Or better yet, find out what they're doing wrong. Look for the Achilles' heel and attempt to exploit it. If that doesn't work, then you know next time what NOT to do. If it does work, then you've... well, I was going to say you have your opponents on their heels, but I doubt Achilles really stood on his heels when he got shot there. Regardless, you've found a way to force the opponents out of their comfort zone.

In the case that these opponents happen to be your practice partners (everyone in StarCraft 2 has a practice partner, why don't Halo teams?), you've likely found mutual benefit for both teams in the process. You've exposed a way to break a set-up, while they've discovered a hole in the hull of the Titanic.

However, if practices are absolutely not working out to build confidence in the players involved, it is imperative that the practice set-up be shifted in order to find a better way for the waning side to benefit as well. A confident team is a strong team. A team that doubts themselves or each other is a disaster waiting to happen.

So again, practices should build competency, chemistry, and confidence. Practices should teach both fundamentals (the basics) and situationals (the what-the-fucks). And to avoid being out-of-practice, practice should keep muscle-memory sharp and skills refined.

Audley Enough, you'll find a team that practICEs enough won't be as cold come time to perform. And on that terrible note, I'm going to end this Audley Enough. Good luck getting that one out of your brain.

Sunday, March 27, 2011

Awareness: Seeing the Big Picture

You know those pictures that, after you stare at it a long time, you're supposed to see a different image?

Well, I'd like to subvert that sentence and say "It has nothing to do with Halo." But if you really like to overthink things, like I do, then Audley Enough you could make the argument that it does.

Today's topic is Awareness. On the base level, Awareness is being able to see what's around you. But if you really look at awareness on a bigger scale, you start to see it differently as well.

If I were to generalize Awareness into separate categories, I would divide them into three: Spatial, Peripheral, and Situational.

Spatial Awareness is an obvious one. It's what you see. In gaming, Spatial Awareness will usually be reflected by a player's reflexes and how fast they respond to visual stimuli.

In Halo, the most basic form of spatial awareness is seeing your enemies. The better your spatial awareness is in that regard, the sooner you'll acknowledge and react to enemies as they come into your field of vision. While gaming reflexes aren't ENTIRELY tied into spatial awareness, better awareness will improve your reflexes. On the flip side, better reflexes won't necessarily improve your spatial awareness.

Additionally, knowledge of data presented on your HUD (such as your radar, ammo counter, or any other data presented in any other game) are related to spatial awareness. Being able to be aware of your radar as well as your gun's aiming reticule is a very basic skill that can make a large difference in a player's gameplay.

Spatial awareness can also improve your mobility around a map. Players with keen vision are more quick to notice the different ways they can get from Point A to Point B when first playing a map.

Spatial awareness is the difference between barely being able to make a jump, and having the ledge only meet your ankles, leaving you to fall to oblivion.

Since spatial awareness is almost entirely taken at face-value (there aren't many nuances to it. You either have it, or you don't) I won't linger too much on the subject, apart from one aside: how to improve your spatial awareness.

Most often, when I see VoD of players reacting very slowly to enemies appearing on screen, I have but one recommendation for them. Go play a Rhythm game. DDR, Guitar Hero, Rock Band, FFR, BeatMania. Any game of this type is excellent for improving your spatial awareness. You have split seconds to react to colored stimuli scrolling up your screen to a certain point. Even if you have generally slow reaction time, you'll find that with practice, you eventually become able to react more quickly to the notes you have to hit. Once you've improved at that, you'll also notice you begin reacting more quickly to that enemy that ran across the top left of your screen.

You can call me crazy for a recommendation like that, but I've always found an improvement in my reflexes when I play a few rounds of Flash Flash Revolution before a scrim in Halo.

If you're finding you have trouble moving around maps due to difficulty making jumps, the only way to improve is to spend time practicing those specific jumps until you can make them running backwards with your eyes closed and controlling your joysticks with your teeth. Knowing the nooks and crannies of a map comes from experience.

Now, on to type 2: Peripheral awareness.

How do you react to enemies beyond your visual periphery? Well, that would be peripheral awareness.

In gaming, most peripheral awareness is auditory in nature. And among the triggers that can clue you in toward objects outside your vision, there are generally two main sources.

In-Game Sound and Communication. In-Game Sound is another pretty skin-deep facet of awareness. You either hear what's going on or you don't. If you don't, you either need better speakers or better ears. (I use an Astro A40 headset. So if I fail to hear a sound in-game, it's lack of ears. If you're on the market for a headset for gaming, and have money to spend, I highly recommend Astro's products. Be sure to get the MixAmp. )

Now, since I've already talked a TON about Communication in my inaugural Audley Enough, hopefully everyone reading here already has top-notch communication! But...what about RESPONDING to communication?

When your entire team is talking, sometimes it's hard to pick out the call-out you need to respond to. Sometimes it's hard to hear an important call-out over one that doesn't pertain to you. If your team's Sniper is screaming out a one shot guy he failed to pick up the headshot on, and the teammate next to you is calmly asking you to back down and stay alive while he finishes the opponent you're fighting, chances are your ears will focus on the Sniper screaming, and you'll keep fighting only to die or trade a 1 for 1.

Being able to train your ears to hear what you need to hear (and even more, to hear EVERYTHING and respond to which one you needed to hear) is a very important skill when playing with highly communicative teams. While sometimes people need to learn to be more quiet in their calling out (so as not to yell over quieter teammates), it's still necessary to be able to sort layered calls out in an instant and react accordingly.

If three people are talking at the same time, there are a few possibilities for how you will react, or even what you will get out of the communication. A very weak peripherally aware player will fail to obtain any information, and tell everyone to stop talking at the same time. Other weak PA players will hear all three, but their minds will combine them all into one garbled message. "No, I'm sorry, I don't know about the elephant that trampled the New York Giants' win streak." Nor do you know about peripheral awareness!

As peripheral awareness in that instance improves, the sentences get heard individually, with the person speaking them separated. At the apex of awareness, the player whose call-out is most relevant to you personally is the one whose gets focused on in your mind.

The best way I can recommend to improve your ability to pick out the important call-out when several are being made is to, in less important gaming times, have some form of loud background noise also layered in with your sounds. Music or talk radio is usually a good choice (especially for players with headsets, when the music can be sent through the same headset as your in-game sound). As you grow more accustomed to hearing call-outs over music or unrelated talking, you'll be better at hearing important call-outs when you're in a more serious game, with the extraneous sound stripped.

As you become more peripherally aware, you'll know more and more often where your enemies and teammates are, even if you don't see them yourself. Once you're aware of where your enemies are, and where your teammates are, then it's time for awareness category #3, the big one: Situational Awareness.

Now, I talked about a large important chunk of situational awareness last week, when I discussed positioning. You'll always want to position in ways yadda yadda yadda goreaditifyoudidn'talready.

Situational awareness is knowing what to do and when to do it. Not just knowing what kind of situation you're in, but how to move into a better one.

Often, it's referred to as "decision making." But situational awareness is a little bit deeper, as it also explains why you're making the decisions you're making. If you were on Let's Make a Deal, and presented with the options of Door #1, Door #2, or Half-Opened Curtain #3, you wouldn't just pick Half-Opened Curtain #3 without being aware of the fact that there was clearly an Ogre behind it, with the demolished corpse of your long-lost brother smashed upon his club (unless you were seeking vengeance, that is).

Decision-making is usually something you can only improve retrospectively. Go back and watch your game films and look to answer a few criteria:
1) Why did I make this decision?
2) Did making this decision put me in a better position?
3) If it put me in a worse position, was the trade-off worth it? (Did you secure a power weapon? Did you improve your team's lead?)
4) Was their another way I could've achieved the same result with better consequences?

Experience is the best teacher for decision making. Analyzing your gameplay is a lot easier and saving game film to watch and analyze can take your improvement progress through the hyperbolic time chamber (That's right, I just made a Dragon Ball Z reference, readers. Deal with THAT.)

But again, decision making is just a part of situational awareness.

Even if you have excellent decision making, your situational awareness may not necessarily be as good.

I'll give a scenario to explain myself here.

Two players on Countdown are standing in cross positions at each side's third floor balcony. They each fire equal, max firing rate for the first two shots. Each lands the first shot and misses the second. Both players spam a third shot. Player one lands his shot, but player two misses.

From here, Player 2 makes the decision to back down from the fight. Because he was behind in the fight, this is a good decision (probably...we're theorizing in a vacuum here which can be impractical at times). Anyway, Player 1 knows he landed two shots, which means a grenade could finish the kill. So he throws both his grenades toward radio (Player 2's best escape path) and attempts to get the kill. Player two dodges.

Both get their shields back. Now there is one important piece of information Player 2 has that should come into play before he makes a decision on where to go from here.

If you said "that Player 1 has a better DMR, lol!" then no, shut up, you're an ass. Player 1 no longer has grenades. Either 1) Player 2 will have an advantage in the next fight. or 2) Player 1 will be moving to a place where grenades spawn. This kind of information is directly related to situational awareness.

Imagine the scene in Dirty Harry, if the guy had been a bit more situationally aware, he would've known. Clearly, Clint Eastwood's character fired six shots. (Not that it would've mattered, the guy only had one useable arm and was already on his back in front of a standing foe...but still.) Knowing how much ammo your opponent has remaining in a magazine, whether or not a weapon you're about to pick up has to be reloaded, or other subtle nuances of that type are all forms of situational awareness.

An opponent fires one rocket at you then immediately switches to a DMR and tries to clean you up. You still kill the enemy. Upon the enemy's death, a set of rockets falls to the ground. A situationally aware player will immediately be able to realize, "Those rockets have to be reloaded!" Because in almost any situation, a player would not switch off of Rockets (unless it was a long-range battle) if a second rocket was loaded and ready to be fired. So if you were no shields after the fight with the rocket guy, it would generally be a poor decision to rush to those rockets. Picking them up will lead to a reload animation and you would not be able to fight back immediately.

The final form of situational awareness is strategic awareness. Sometimes there's a "best option" a player can take to get from one position to another. This may mean a better route you can take to get to a power weapon. It may mean a better weapon you can use to counter an enemy. Sometimes, though, it's not related to the options available to you.

Situational awareness also includes being able to get into the mind of your opponents, and know what THEIR decisions will be. Knowing the potential routes an opponent can take, and being able to guess what their goal is, will allow you to be a step ahead of your opponents. Take the standard BTB opening from Standoff, for example. The majority of games on that map began with both teams trading massive amounts of grenades at each others' Warthog spawn area. Why? Because from your initial spawn, there was really only one way to go: forward. Both teams wanted the laser, located a short rush in front of the base. The grenades could disrupt the warthog and damage any enemies that went directly forward in front of the base. This grenading was a response to strategic awareness.

Sometimes, opponents may attempt to use strategic awareness against you. They may expect you to take a specific action based off what they expect to be the best action. So how do you respond to this? Intentionally take a less desirable action in order to catch the opponent off-guard. This is called Meta-Gaming. (And it's something I'm going to talk a lot more deeply about in a future Audley Enough.) But for now, we'll summarize metagaming as: when two players are equally aware of the best decision, it's often a better decision to make a worse decision. Open bracket slash confusion close bracket.

Because of its reliance on spatial and peripheral awareness, taking the steps I mentioned to improve those will have positive effects on your ability to take in the information with which you're presented in a game. However, situational awareness, like decision making, is something that must ultimately be improved through experience. The more experience you have, the more you can guess an opponent's likely responses, and the more you can pre-emptively react accordingly. The more experience you have, the more you can guess an opponent's guess of your guesses, and counteract accordingly.

If you want to improve your situational awareness, the first start is to improve your other forms of awareness. Put limitations on yourself in more relaxed games that push you to improve certain skill-sets ("Only use Hologram" for example is one limitation I like to give myself. That way I never have any guaranteed way out of a bad situation. I have to learn not to get into a bad situation, or find easier ways out.)

Well-rounded players typically have better situational awareness than specialized ones. While specialized players may have excellent decision making for their specific role they bring to a team, well-rounded players have more experience filling other roles. This unique trait gives them more first-hand knowledge of potential situations they may have gotten into in the past. Because well-rounded players have been in another players shoes and sometimes Evaded a mile, they're generally more equipped to know what can happen in a given situation.

These bits and pieces of seen, heard, and thought information all combine into one moving unit we call a game. And being able to perceive and conceive all of these potential ways a game can go, and react in a way to make the game go the way YOU want it to do, all stems from that one trait we like to call Awareness.

That's all for this week, folks.

Saturday, March 19, 2011

Positioning: The Paramount of a Skillful Player

So, you guys remember a few weeks back when I wrote a big huge article about how Movement was the most important aspect of a competitive game?

Today I'm going to talk about something that stems from that: the most important skill of a competitive game. If Movement is the most important aspect, then it's a logical conclusion that Positioning is the most important skill.

(I'm going to go ahead and cut in on anyone who said "Manual dexterity" or "Awareness" are more important. I'll agree on the latter, as Positioning is actually part of awareness, more specifically, a part of situational awareness. But for the purposes of this blog, I'm going to talk about how movement around a map is the most important skill to a competitive game.)

It's fairly obvious based off my previous blog that I believe competitive games should encourage movement. Players should have goals that require them to leave their most powerful positions in order to gain advantages so they may get ahead and still be encouraged to get further ahead. Situations in which a player is encouraged to 'camp with the lead' are typically less competitive (although sometimes more tense) than situations where a player must press his advantage or lose it.

Now, it's time to apply that to the player's actions, rather than the design of the game. This is where Positioning comes into play. By positioning, of course, I mean the placement of a player (or his units) around a map at any given moment.

In StarCraft 2, this could refer to the bases to which you expand, as well as the location you decide to move your army. A unit positioned at a Xel'Naga Watchtower, for instance, is at an advantage over one attempting to move within the vision radius of said watchtower, as the former unit has vision much sooner of the latter and can react accordingly.

Currently, StarCraft 2's most consistent-placing player (with two First Place finishes in the Global StarCraft League in Korea) is oGsMC. MC is notorious for a heavy Sentry-based army composition he wields against his opponents. For those of you reading that play StarCraft 2, you may be thinking "But Sentries don't really deal that much damage." For those of you that don't play StarCraft 2, you're probably lost right now.

It's true, Sentries' attack is essentially tickling someone to death. They deal much, MUCH less damage than any other unit available to Protoss (save for a Probe, Observer, or Warp Prism, which aren't designed to engage in combat). However, the Sentry has one ability that isn't available to any other unit in the game: Force Field.

Force Fields create a (mostly) impassable block over terrain. (I say 'mostly' because certain units such as the Thor and Colossus can walk over the force field to pop it, and Roaches can move while burrowed under it.) For those of you still scratching your head as to why this is important...it's positioning.

Sentries allow you to completely determine the positioning of your opponent's army. If you're at a choke point, you can block it with a force field and only allow a few enemy units up at a time. If you're in a wide open area, but you have multiple sentries (like MC does), you can literally cut an enemy's forces in half by spamming force fields along the concave of his army. With his forces split, that means at least half his army is out of positioning, while yours is all at fighting force. If your opponent is trying to run with a weaker army, you can force field his escape path in order to ensure your army mops up and continues to push.

I personally believe Protoss are overpowered in StarCraft 2 almost entirely on the backs of the Sentry's Force Field ability (although Blink Stalkers are pretty B.S. as well). Those two abilities are the only two non-transport abilities in the entire game that can affect a unit's positioning.

To further support this case -- LiquidHuk (a Canadian/North American player) has recently made it to Code S (meaning, he's a Top 32 StarCraft 2 player in the world). Mechanically, his gameplay is much weaker than his opponents. However like oGsMC, he plays a more Sentry-focused build and positions his force fields well. Plenty of mechanical mistakes can be made up for by proper positioning.

This brings us to the next title I brought up in my blog about movement, League of Legends. I'll keep this one brief, but there are a few main important things regarding positioning in League of Legends.

The first is EXP Range. Minions that die have a certain range in which you must be in order to gain EXP from them (unless you were the one to actually kill the minion...but most skills don't have a long enough range to kill from outside EXP range). This means that during the laning phase, a player or team with a stronger lane can zone an enemy out from this range, while remaining in range to gain the experience from enemy creep that are dying. In essence, they are denying experience to their opponents, and gaining a level advantage.

It's a very basic skill to learn, but it's often only exhibited by skilled players. It is an example of pressing an advantage (a better lane composition) to gain a bigger advantage (a level advantage) by being encouraged to move. Sure, you could sit back and safely farm, but if you can move to threaten an enemy to force the enemy to back off and let you free farm without being able to farm themselves, WHY WOULDN'T YOU?

The next piece regarding positioning in League of Legends is simply the positioning of a team fight. I mentioned in a previous article (see: Composition) that you typically want to target down DPS players before Tanks. Can you see where I'm going with this?

If you said "I should run straight at a DPS player and try to attack him!"

No, shut up, you're wrong.

First: DPS positioning. You should almost always be near the back of your team, but not back far enough that you cannot deal damage, nor back too far that you can easily be flanked. You need to be near to your supports (who can protect you) and near your tank (so you can damage what he disables.)

Support positioning: You should be near your DPS Carries (so you can protect them) but as far away from the enemy as possible (supports often get focused before DPS because of their ability to protect so well.) The exceptions to this rule are the carries who also deal tons of damage or are hybrid tank (like my main, Alistar.)

Tank positioning: This is tricky, and really varies from tank to tank. However, tanks are generally tasked with initiation. This means they have two goals: 1) Be in a position to convince your opponents to attack you first. Generally, good players will "ignore the tank, focus on DPS." So sometimes, even if you run straight at opponents, if your team is nearby, they'll ignore you. 2) Be in a position to immediately threaten the enemy's DPS.

If you attempt to walk directly at the opponents they'll either 1) counter-initiate, and disable your entire team or 2) kite you, dealing long-range damage and retreating from your failed initiation. This generally means a tank's job is to flank in League of Legends (which makes the positioning for the rest of his team kind of tricky, unless they are simply baiting the opponents out of position for the tank to do so).

So tanks have the most complicated job of positioning themselves. How do you come from an angle from which the enemy DPS is exposed, while still being in position to prevent your unguarded allies from being initiated on? Tank players that can answer these questions to themselves are usually those that shine in their role. Anyone can play a tank, but few can play a tank extraordinarily well. And a large part of that comes from the player's positioning.

Finally, there is one Support champion that is generally regarded as hands-down the best support champion in the game, and "a complete counter to Area of Effect clusterfucks."

That champion is Janna. Her ability set allows her to disable enemies from a range (meaning she can be quite far away from enemies and allies and still disable to protect those in danger). It also allows her entire team to move faster, as well as her to move even faster than that. She can shield an ally who gets out of position in order to mitigate the damage they take. And finally, she has one ability that out-shines almost any other in the game.

It's called Monsoon. Once every two minutes, a Janna player can press his or her R button and in an area around them knock back any enemy champion. The direction the champion flies depends on where they were standing in regards to Janna. This can be used to knock away chasing enemies, split up entire enemy forces, get a pesky enemy off one of your squishy teammates, or knock an enemy back toward your towers and your team. It can single-handedly affect the positioning of all five enemy players. And all she has to do is be semi-kinda-sorta near you for you to be affected by it.

Janna is in a state right now of being banned in nearly all high-elo games, due in no small part to her ability to say FUCK YOU to the necessity of intelligent positioning, whether it be hers, or that of her opponents.

And now, on to Halo. Since I'm sure most of you reading this play Halo, and probably don't care about those first two games. But I include them, because they help to make a point (and you're probably subconsciously thinking about how to apply some of those examples up above to Halo, even if you don't realize you're doing it.)

Some of the important facets of positioning in Halo are pretty obvious, even at face value.

You want to move to places that have power weapons, because duh power weapons are powerful. If you don't understand that, you probably have nothing to gain from reading this blog.

You want to move side to side to attempt to avoid bullets in a fire fight. We call this strafing. While this is micromanagement of positioning, and more reliant on manual dexterity, it still can mitigate a lot of potential damage. A player with an excellent and unpredictable strafe will typically win the majority of their one on one battles against an opponent with a weaker strafe.

You want to move to a high ground. High ground offers some immediately obvious advantages. Most of you probably jumped straight to: you can see more of the map from up high, which means you have more potential targets to shoot at. (Caveat: this also means more people can see you, which means more potential assailants upon you. If they have a weapon with range to fight you...which, given DMR starts, means they DO have a weapon with range to fight you...then they will probably shoot you if you are a threat.)

The largest advantage of high ground is something that people use often without consciously realizing they're doing it. It's natural cover. If you're fighting someone on the ground below you, less of your body is showing (since you fire from your upper body, rather than your toes.) This means the opponent has less surface area upon which they can hit you. It also means that you can remove yourself from an opponent's vision by moving backwards.

If you are to do this, the opponent not only loses track of where you will assault from next (assuming you strafe just outside of their vision), but it also means they have only one way to regain vision of you easily: jump. Jumping makes them more visible, and forced into a predictable strafe. This will allow you to more easily land your shots upon them.

Because of high ground's positional advantage, a lot of (well-designed, competitive) maps will stray away from placing power weapons in high positions. This is a good thing, because it requires players to make positional trade-offs in order to gain their advantages.

Some of you are probably saying "Hey Audley, what about MLG's Snipe 3 on Guardian?" Well Point 1) It was a more balanced location than Snipe 1, since both teams could reach it with fairly even contestation, Point 2) it was a relic from the map Guardian was inspired by (Lockout), and Point 3) Snipe 3 is one of the most vulnerable locations on the map, due to its ability to catch grenades so well. Attempting to Snipe from up there was a death trap unless your opponents were already forced low. Stop arguing with me, Hypothetical Reader.

So if you can't get a power weapon from a high ground position, or said high ground position is too dangerous to fight from...what are you supposed to do?

First off, you have to put yourself in a position to get the power weapon in the first place. Generally, these are in positions where players will have to fight for them.

Remember when I was talking about League of Legends earlier? (No? You skipped it? Scroll back up and read that section, trust me.) Well, if you were to rush straight to a DPS Champion, which I said was a bad thing to do, you'd probably die to his entire team very quickly (focus fire hurts). The same goes for rushing straight to a power weapon (when it's placed well).

A player who mindlessly runs straight in to, say, Rocket spawn on Pit from MLG in Halo 3, or straight to Laser on Standoff in Halo 3, or straight to rockets on Boardwalk in Reach is generally going to die, quickly. These are in positions that either pass through choke points (Pit/Boardwalk Rockets) or are in areas of wide-opened sight lines (Standoff Laser) that all make it easy to kill someone who attempts to rush straight there.

I've mentioned the word "choke point" a couple of times now over the course of this article. The first was with regards to Force Fields from Sentries blocking choke points. Just now, I mentioned passing through choke points in order to reach a power weapon.
Choke points are dangerous places. They have very little room for lateral movement. You can either go forward, through them, or go back and leave them alone. If you decide to go through them, you are limiting your options for movement (and thusly your options for positioning).

If your opponents are attempting to haplessly advance through a choke point, there's one tool in your pocket that can halt that idea in its tracks. Well, hopefully you have at least one handy. You spawn with two of them. Say it with me now, class, Pistol cli--okay, I'm kidding. Grenades.

Grenades in the Halo games are often misinterpreted as tools for killing. In Reach, this is even more the case as the grenades feel very powerful. However, if you observe extremely high level play in the Halo games, you'll find that more often than not, grenades are not used as a weapon. They are used more as a Swiss Army Knife. It's not often you use a Swiss Army Knife to gut open a guy (although it is an option). You bust out the can-opener attachment and have yourself some Campbell's Soup. Eff yeah. Campbell's Soup.

Audley, what the devil are you talking about, Campbell's Soup? I thought you were talking about Grenades. While I admit the analogy was a bit odd, Grenades from skilled players are used most often to do a task without damage as a requisite consequence.

Sentry Force Fields can do it. Strong laning champions can do it in League of Legends. It's called Zoning.

Zoning is a way of forceably controlling your opponent's positioning. Typically, if players observe a threat to their well-being, they move away from it (or avoid passing into it.) So, for example, if you were attempting to rush through a choke point to get to a Rocket Launcher, and a grenade lands just barely ahead of you, you are given two options. You can suck it up and take the damage, leaving yourself very susceptible to a quick clean-up shot to kill you, or you can back off and let the grenade explode harmlessly.

Except even if the grenade doesn't deal damage, it still wasn't harmless. Like a Sentry force field that prevented you from pushing up the ramp into the enemy base, or like a Garen hiding in the bush to scare you out of experience range in lane in League of Legends, the grenade has zoned you out of your goal. You're delayed during the fuse time of the grenade, which means a few more seconds an enemy may move into position to battle you. Controlling your opponent's movements is one of the single greatest positioning-related skills you can begin to master.

If an opponent is running away, and you know where they are going to go, which is the better choice: attempting to shoot at them, while they're evading/sprinting/strafing away, or throwing a grenade just beyond where they are currently, forcing them to either die to the grenade, or stop and face certain death anyway?

The latter is the safer option. If you take the former choice, and the opponent manages to find cover or escape around a corner, you've missed out on a kill.

Another situation where a grenade can be effective without dealing any damage -- when enemies are attempting to reinforce their teammates. If their avenues to do so are limited, you can limit them further by placing a grenade along the path they would be most likely to take. If an overaggressive enemy over-extends onto your side in blatantly obvious bad positioning, throw a grenade where you believe his teammates will come from, THEN engage the stranded enemy. Chances are, that aggressive player is a Tank, and he's simply trying to get your attention long enough for his teammates to deal the damage to you. Cutting off those allies' reinforcement routes will also reduce the chances of his gambit being a success.

Halo: Combat Evolved gave grenades yet another positioning-related power that is not exercised nearly as prominently in the more recent titles. You could grenade weapons and even power-ups away from their spawn. This meant two things: 1) You could knock a risky weapon out of a risky position and 2) You could anticipate where a power-up would land from a grenade and knock it out of the generally expected position.

While we can still grenade weapons out of position in Reach, it's not nearly as effective as it was in the original Halo. It leaves me a little bit sad.

Another obvious positioning-related bit of information:
You want to move with your team.

This does not mean you want to bunch up together in a Flying V formation and run across the map. While humorous to see and be a part of, it's stupid and impractical.

More specificially, you want to move in a manner that allows you to help your team without being susceptible to splash damage.

Take Rat's Nest on Halo 3 for example. If you wanted to invade an opponent's Kitchen, it would be a poor idea to send four people across the bridge at the same time. A few grenades, a rocket, or a clip of Brute Shot would deal enough damage for someone to claim an Overkill. Instead, you'd want to try to engage from multiple entrances. Maybe one person across the bridge, one through the turret door, and two from the bottom floor (uh oh, no height advantage!) This would allow you all to help one another (the two coming from down low would likely have sightlines on anyone visible to the person coming from bridge, save for people directly above the bridge door, while the person coming from turret would be able to help the person coming across bridge with anyone actually at the bridge door).

A Sniper doesn't really want to move forward with his team, but he wants to put himself in a position that allows him to shoot what his team needs him to shoot the most. In Halo 3 (again with the Halo 3 references, Audley, what gives?) this was most prominent on Valhalla. If your team did not have hill control, the Sniper's biggest concern didn't need to be the enemies on the hill itself. Typically, a Waterfall Sniper needed to worry about the opponents at Turret (they controlled the choke point known as Water Cave). A Beach Sniper needed to worry about the opponents on the Pelican (they controlled the choke point known as Territory 4). Once the enemies possessing the ability to slay your choke point pushers were slain, you could begin to take a foothold back and potentially regain control of the hill. Teams that were unable to retake hill control were often unable to do so because of their Sniper's positioning.

In Halo Reach, one of the most common tactics on smaller maps outside of situations where it's not available, is to group up with Armor Lock. When you engage an enemy at a choke point, one player goes through first, getting the enemy's attention (and dealing a little damage). He or she then armor locks, and the next player (or two) come through, cleaning up the kills in the next room. This is an example of players moving as a team, as well as practicing the Tank / DPS roles (tank gets focus, gets enemy to burn ammo/grenades, then DPS come in to clean up).

On Hemorrhage in Halo Reach, attempting to assault an enemy Wraith is a daunting task. While a large part of that is the sheer power of the Wraith, one may find that an organized team is also protecting their Wraith with the very agile, anti-vehicular menace known as the Revenant. The Revenant moves in a manner to guard the Wraith from assaulting Warthogs, Ghosts, and enemy Revenants. And guess what? The Wraith stays alive for a long period of time, thanks to the Support (yes, capitalized) from the Revenant.

Being aware of your teammates' movements is a staple for positioning yourself. If you end up herp-a-derp zerging closely behind an ally, chances are the both of you will end up dead. If you both go for the same power weapon at the same time, that's less presence your team has on the map at any given time.

And that brings me to my next point, zone control.

At any given time, you want to have as much map presence as you possibly can, without leaving any of your team isolated.

The more holes you have in your cupboard, the more likely a mouse will feed. Likewise, the more holes you leave in your team's defenses, the more likely a player may sneak past and get behind your team.

An isolated teammate is a teammate you're asking to have killed. (Or if the case was self-isolation, the teammates is asking to be killed.) An uncontested zone is a zone you're asking to have taken.

We'll go back to Valhalla from Halo 3 again. That's right, gang, more Halo 3 references. If you did not control Pelican, your enemy took Pelican. And that meant they had a foothold from which to retake the hill. If you did not control Turret, your enemy could control turret. And that meant a foothold from which to retake the hill. Uncontested zones being given up led to loss of hill control.

On The Pit, in a 4v4 setting, this was a mess, and a large part of why I had a strong distaste for the map in Slayer variants. There were essentially four lanes across the map: Long Hall, Green Hall, Bridge/Sword, and OS. In 4v4, this meant you had two options: Leave every lane with an isolated player to control it or heavy push one lane and risk the enemy taking another lane.

In close games of Slayer, because of these choices, it typically led to the third option: "Sit around out of view for two or three minutes until the next power weapon spawns, then do what you can to get it." Although these games were tense when the score was near tied, it led to some of the most boring spectator experiences I've ever had from MLG.

In Halo Reach, this lesson is probably best taught on the Noble map, Tempest. I see two mistakes made rather often even in organized play on the map.

The first mistake is with regards to uncontested zones or isolated players. For some reason, players like to gravitate toward the Long Sword side of the map (and disregard the fact that the map is functionally the same on the opposite side). This often allows deviant players to slip past into the enemy's base via the river, or push down the sole defender of the side and continue advancing. Sorry Gandalf, but this time I SHALL PASS.

The second mistake I see made is with regards to the form of pushing I see employed upon the map.

I'm going to ask you readers to ponder for a moment, what is the strongest shape an army can take?

To anyone that said Flying V!!! No, shut up, you're wrong. Unless you mean a backwards V, then you're at least close. But that would be a Flying Lambda. I'll give you a hint: I mentioned the word earlier in the article. Up there in the StarCraft section.

Concave. You ideally want to be Concave around your opponents. It constricts opponents' movement options the most and allows you the most strength in your zoning and reinforcement.

Oftentimes, players try to push the enemy turret before attempting to secure their flanks. And this is where they are mistaken.

It's much easier to assist your allies who are pushing the enemy caves or man-cannon from your turret than it is to do so from the enemy turret. The sight lines are more open.

Additionally, it's much easier for your allies in those positions to assist YOU once you begin to push than it would have been if they were still around your mancannon or shotugn. If they are pushed up to semi-surround your opponents, then they are not only limiting your opponents' retreat options, but chances are they also have sight-lines into the side of the enemies, allowing a much easier team shot opportunity.

Once you have secured a concave around the perimeter of your opponents' base, it's much easier to collapse that perimeter where it's necessary in order to completely control your enemies.

Attempting to pressure your opponents in this manner also prevents those gaps through which those pesky aforementioned "mice" may sneak into your base, leaving your team from being forced into a situation of uncontested zones or isolated players, which happens much more often when teams attempt to push in a much more expanded Flying V that sometimes tends to happen on Tempest.

Once you've mastered moving with your team in a manner that prevents you from being caught alone, prevents your allies from being caught alone, allows you to secure power weapons, prevents your enemies from moving to reinforce, and prevents enemies from escaping, you've begun to master what it takes to position yourself properly to be a superb Halo player.

While intelligent positioning (and zoning) do not make you a master of the game, they can often serve as buffers from other weaknesses, such as poor accuracy or lack of communication. And that is why Positioning is (one of) the most important skill(s) in competitive gaming.

When you Master positioning, you not only control your own destiny, but often you control your opponent's.

Monday, March 14, 2011

Feeling Defiant

Reach has fallen. The glassing has begun. No weapons we unearth now can save us from the Covenant.

But despite all that, Certain Affinity and 343 Industries have banded together to bring us three brand new play spaces for Halo Reach: Highlands, Condemned, and the brand new Firefight map, Unearthed.

For their first map pack as the new hands controlling the Halo series we've all grown to love, Certain Affinity decided to offer up three vastly different settings for their new maps.

Highlands takes place in a humongous two-base (somewhat/functionally) symmetrical map, on the planet Reach with the Covenant glassing the planet in the background. Condemned takes place upon a defunct UNSC space station, with the dying planet below, and Covenant/UNSC ships battling it out in space outside the station. Unearthed takes place upon a massive dig site.

If you like Big Team, Highlands is the map for you. Each side is given a Sniper, a set of Rockets and a Warthog to work with, guaranteed, with a quick jump to the middle (through a one-way teleporter, of course) where one may also secure a Shotgun.

Neutral, contestable weapons include two Ghosts, a Grenade Launcher, and two more power weapons connected by a two-way teleporter: the Spartan Laser and the Plasma Launcher. The map will definitely help to fill up that craving for a larger vehicular BTB map not dominated from the skies.

All in all, the play space is beautiful -- it's got a similar style to the Firefight map Overlook, with a sort of moss-covered, pastoral pallet. The map feels like a painting, with intricate detail that allows the player a freedom from ever feeling lost, even if he or she has never played the map before.

The map is similar in size to Hemorrhage (possibly larger), but the sight lines are segmented in such a way that it makes the map feel even larger. Individual skill will definitely be displayed even in the 8v8 contests of Big Team, as some important zones of control will not be prone to bumrushing with a few spare hands. A well-placed grenade (or two) and a solid DMR can quickly turn a 1v2 in a choke point into a victory for the outnumbered.

The flag spawns, in objective, atop a three-story tower with each floor giving access to a lift to take you to the top floor, where the Sniper may also be found. From here, the player may make the daring choice to pull the flag further into the base (in a style similar to Avalanche) in order to run the flag out through the Portal that leaps to roughly mid-map. Alternatively, the player can attempt to zerg the flag across the map, or coordinate with a teammate for a pick-up to beat a hasty retreat.

The downed Pelican in the center of the map houses the Grenade Launcher, which will be important for stopping the ghosts that may be given free reign over the map with it's much more refined sight lines. Being caught in the open without rockets or armor lock is likely to be paramount to leaving the skin of your face to melt upon the Covenant speeder's plasma cannons.

All in all, the map feels as though it will bring a complete package of gameplay. There's enough open air to have larger scale firefights, while there's also enough to break view to allow for stealthy play, and enough room-to-room combat to allow an individual's skill to shine.

Up next we have the smaller of the matchmaking maps, Condemned. I use the word smaller lightly, as it's one of the largest non-Big Team maps I've had the pleasure of playing on.

The atmosphere of the abandoned space station is not a happy one -- although there's plenty of light to allow you to see where you're going, the backdrop is a constant reminder of how alone you are.

The indoor map sports a low-gravity section in the center, where Rockets are mounted upon the station's generator. The low-gravity section is marked by a new implementation from Certain Affinity -- rather than using shield doors as the other two low gravity maps (and countless other maps) have used in the past, the marker is more akin to Halo Reach's Hills and Territories marker, a mostly transparent barrier that does not block your weapons.

On either side of the Low-Grav section outside the higher doors, Snipers may be found. These Snipers are in direct cross positions, with both having a nearly direct sightline on each other. Players looking for awesome plays will probably gravitate to this area of the map. The sliver of hope to Snipe a player from across the map's longest sightline lives here.

Moving clockwise from Blue Base, a few hallways lead the player from Blue Sniper to the Sword spawn. Much of this area is sealed off, but it sports an excellent view of the planet below.

Continuing clockwise, the player may find one of the lower entrances to the low-grav center, as well as eventually finding the Shotgun. While neither of these weapons are outright given to one of the two teams in a 4v4 based off spawn, the sword and shotgun are favored toward the blue and red sides, respectively. However, with the contours of the map, it's possible neither could hold onto them for long.

From here, you pass by the Red team's spawning area, past it's Sniper (as I said, it is across from the Blue Sniper), then down a flight of stairs to the docking bay, where a disabled, partially dismantled Sabre serves as a battle platform.

Although this area does not sport any power weapons, it is the shorter path between the two bases if you venture around the map, and features a very aesthetically interesting combat space. The Sabre can be accessed from a jump up on the nose, a lift onto one wing, or from a platform adjacent to the opposite wing, and serves as a hub between those areas, as well as a power position to cut anyone trying to reinforce from their respective bases on the shorter path.

The map's derelict pallet gives a certain hollow feel to the entire map -- leading me to believe it could make for a very excellent zombie space. Not that I play Living Dead gametypes. I don't. But the thought of being locked onto an abandoned space station with zombies, with no hope of escape, and no true hideout? It sounds like fun to me.

The map is well-suited to free for all, due to its size and the risky paths to cross the map to the desired power weapons. Players will find contests over the central hill in a Crazy King gametype to be quite fun. You just can't get angry when you're floating through space. You just can't.

The map could potentially also sport 6v6 gametypes as well. It's much larger than the majority of other skirmish-sized maps, so there's plenty of room for splitting up your team across the map. But don't get separated from your battle buddy...because in space, no one can hear you scream. (Well, except the other 5 guys with microphones on your team.)

Anyone who likes to stray away from Big Team will probably find themselves playing Condemned often. It suits just about any matchmaking playstyle one could imagine, short of Grifball, and allows for very dynamic gameplay.

That brings us to the last of the three maps, and the first of its category to be included in DLC for a primary Halo game: Unearthed, a Firefight map.

Now, I'm normally not a Firefight kind of guy. I never really get into fighting wave after wave of grunts and jackals with a pre-programmed AI when I could be out trying to out-think a human with the other controller.

But even I have to take a step back and applaud Unearthed.

It's a VERY open map, with a ton of freedom of movement. There's maneuverability room for the map's lone Rocket Hog (don't waste it!) as well as for the Wraiths which are periodically dropped for you to snatch from their operators' hands.

Although drops frequently occur on the open outskirts of the map, some occur upon a landing pad that attaches to the mining facility. The interior portion of the map is still rather open, both in spirit, and in choice. Tons of cleverly placed paths to the upper floor can be found to those who look for them, and the aware Firefight player will always be able to find a way to escape a chasing Suicide Grunt.

Cliffs surround the map, meaning there is one complaint I am allowed to voice: BRAGLRGJAELBKJARLKGAERGakl FOCUS RIFLE SKIRMISHERS!

Of course, I only say that in the frustration of having those things tickle me to death with their Baconator Beam countless times. The truth is, it is an excellent obstacle for the tunnel visioned Firefight players to overcome.

Visually, the map is equally astounding to those before it. The backdrop lends a sense of epicness which I never thought could be dug out of such a deserted map. Puns definitely intended.

If you loved Firefight in ODST, you'll love Unearthed.
If you love Firefight in Halo Reach, you'll love Unearthed.
If you don't really care for Firefight at all, you should still play Unearthed, because chances are you'll love it too.

There are several subtle nuances to its design that, as an aspiring game designer myself, just cause me to grin happily and say "I like this."

There's not much to say about the map that I haven't already said, as the Firefight experience is still much the same. But you'll find yourself enjoying the repeated runs of the Rocket Warthog over and over as you play the map. Because let's face it, why NOT ride in a Warthog that fires six rockets at a time?

There are supposed to be some screenshots with this article, but unfortunately for anyone who was looking forward to my first Audley Enough article with imagery, the screenshots I took are considered Classified Intel, and cannot be shared as of yet. Hopefully I can have them uploaded by the time the maps go live, so anyone on the fence about the maps who happens to read this article will have to say "That looks awesome, I'm going to buy it."

If you are on the fence about the maps, get off the fence. Go get the maps (when they're released). If you've got time to sit here reading a blog by some random guy who writes about League of Legends in his Halo blog, then you've got time that SHOULD be spent playing Halo on the new maps with a group of friends. And heck, you may have time to finally go get that Firefight achievement you're still aiming for. With Unearthed letting you roam free on a Rocket Hog, you really don't have an excuse NOT to anymore.

Audley Enough, some of you still won't be convinced. So I have but one thing left to say (which is supposed to be my catch phrase): No, shut up, you're wrong. Get the new maps. They're FUN.

Sunday, March 13, 2011

Lone Wolf: The Ambiguous Fourth Role

So last week, I talked about three roles players are typically divided into based on their playing style. And generally, a strong team will be balanced with those three roles.

I also hinted that there was one more role I did not discuss.

It's tricky, but there is yet another role that is often crucial to completing a team's composition: The Lone Wolf.

I'll first make a quick comparison, once again, to League of Legends, where even if you have a tank, two DPS, and a support champion, your team composition has one more role to fill: the Jungler. The Jungler in LoL is much like a Lone Wolf player in Halo.

A Jungler's job, from the start of the game, is not to venture into the lanes with the rest of his or her team. Instead, the Jungler ventures into, well, obviously the jungles... where he or she will level up and gain buffs (I touched on Jungling briefly in my article about Movement.)

In addition to the experience benefits having a Jungler nets your team as a whole, there's one more excellent benefit -- the Jungler is given the freedom to roam. This means they can show up in any lane to help their team at any time, and possibly secure a kill or two. They can show up in the opponent's jungle to interrupt, intercept, or just engage the unprepared or weaker jungler. Not having a Jungler sets your team behind on levels, but also means at any given time, all your players are accounted for.

Generally, your players with specific roles are going to gravitate to specific positions, specifically the ones that allow them to perform their job the best. Tanks will have standard routes they take. DPS have power positions that allow them to cover the most ground and deal the most damage. Support have positions that allow them to cover the most area necessary to protect the DPS and set them up for kills.

In League of Legends, the Jungler is not restricted to being a DPS, a Tank, or a Support -- as a few champions from any of those roles can be a passable jungler. Likewise, a Lone Wolf-style player is not restricted to a single role.

Don't mistake that statement as "Lone Wolves are never just one role." That's not true either. Some Lone Wolves are tanks. Some Lone Wolves are DPS. Some Lone Wolves are support. The difference is that Lone Wolves have a completely different mindset in doing so.

A traditional tank will often be constantly communicating to his team where he's pushing or when he's about to bait, and pull his team along with him. The Lone Wolf tank will instead go where action is necessary and draw attention to himself in whatever way possible. They'll want players shooting at them, but unlike a more traditional tank, the Lone Wolf tank is often a player who expects to triumph over at least one (usually more) obstacles on their way to their objective.

A traditional support will often control specific zones of the map, depending upon where best allows them to protect their DPS or weaken enemies. A Lone Wolf support will instead drift from DPS to DPS or engagement to engagement, softening up whomever they can wherever they can.

The traditional DPS and Lone Wolf DPS are the closest in appearance. Both somewhat expect their team to play around them (in the case of a traditional DPS, the team SHOULD be playing around them, period. Everyone else's positioning should be in a manner that allows their DPS to do their job.) Lone Wolf DPS are a bit more difficult to specifically set up around -- unless your team's composition is also built around it.

Lone Wolf players are usually excellent route-takers. Look at any FFA winner from an MLG event, and you'll see a pattern: They know how to move around the map to stay alive, but still have vision where they need it. Pistola is a prime example -- he was fairly well known for his FFA abilities in Halo 2, but in Halo 3 he began to shine on teams. A large part of this came from his dynamic duo partner, Heinz, but even after the two were forced to split, Pistola continued to shine as he was partnered with another versatile teammate in Ogre 2.

Lone Wolves by name may not seem to be a positive attribute to a team, but they allow your team to be more dynamic in its gameplay and less at risk to fall into a stagnant, predictable pattern. They are often more reactionary by style, while remaining proactive, whereas more traditional players are more apt to follow a similar pattern game after game.

It may seem like I'm saying "You must have a Lone Wolf-style player to win any game ever, otherwise people will always know what you're going to do before you do it!" Well... No, shut up, you're wrong. (Anubis says this should be my catchphrase.)

I'm not saying Lone Wolves are absolutes in their necessity for a balanced team composition, nor am I saying players who aren't Lone Wolves are inherently counterable.

Lone Wolves are a huge boon to a team's ability to adapt to multiple circumstances and playstyles. They are less prone to being metagamed by opposing teams. However, because of their more reactionary nature, they are also players who tend to benefit the team less as the team as a whole begins to underperform. This doesn't necessarily mean the Lone Wolf will play poorly -- often, it's the exact opposite and the Lone Wolf will continue to put up impressive stats. But, unfortunately, their skillset is not geared toward pushing a snowball back up a hill.

The Lone Wolf's permanent state of flux acts against a team in the case where teammates are underperforming, as the necessary catalysts for their reactions increase in number.

Lone Wolves are just another role that should be considered when attempting to assemble your perfect dream team. If, upon looking at your team's line-up that you believe it to be heavy on players with extremely predictable or molded styles, a Lone Wolf would be an excellent addition to your team, allowing one amoeba to float among your prokaryotic team. If your team seems more dynamic by nature, or more tactical as opposed to strategic, then a Lone Wolf would likely fit into the group like a glove.

However, if your team relies on strict teamwork, with all units working as one, a Lone Wolf would go against this grain, and be a risk toward dissent among the group. Exercise caution.

(Note: Some of you who read my articles are also League of Legends players, and you'll probably make the observation that not having a Jungler is a STUPID idea in 99 out of 100 cases. While this is true, I believe it to be more of a balance issue with experience in the jungles and the overpowering strength of the Jungle Buffs. In Solo Queue, not having a Jungler is a death sentence, just like not having a Tank.

In a more organized setting, there are additional benefits toward not having a jungler. You are able to zone the top lane, negating their EXP advantage, and often you're also able to get the early tower kill on that lane. Strong zoning champions like Alistar are excellent alternatives toward a Jungler in this case. Additionally, you can still fill the role of a permanent roamer with champions such as Poppy or Evelynn, so long as they continue to get kills, but without the time spent in the Jungle.)

Audley Enough, despite me talking up the Lone Wolf in such detail compared to the other three roles, I am NOT a lone wolf myself. I'm a traditional tank in the most traditional sense of the word, with a little spice of Support mixed in. While I can Jungle in League of Legends (I'm the inventor of the Cloth Armor + 5 Potion opening. I've Jungled as Twitch. I know my way around those jungles.), I do not find it to be my preferred playstyle of choice, and typically underperform when asked to do so.


Be sure you check back tomorrow night. There will be an extra special Audley Enough article, with a preview of the Defiant Map Pack, complete with pictures.